How to scan network devices with WFilter free?

Using the “Network Scan” plugin of WFilter. Not only you can scan online list of devices, device type, os, IP and MAC address, you also can get a list of open ports of each device.

In this example, I will guide you to use the “Network Scan” plugin of WFilter Free

1. Install “Network Scan plugin”

Click “Download Plugins” in “System Settings”->”Plugins”. Find the “Network Scan plugin” and install it.

2.Launch this plugin to scan your network

2.1 Local Subnet Scan

You can choose “Local Subnet Computers” for a local subnet scan. The maximum “Threads” number is related to your hardware capability.

When the scan finished, you’ll get a full list of online devices, together with ip address, MAC address and manufacturer, os type, ping value, netbios and open ports. Andriod phone and iphone can also be detected.

2.2 Scan by ip range

You also can input ip address to scan a target ip range.

WFilter 4.1 version is coming.

Finally, WFilter 4.1 version is coming to the beta testing after two years of development. Now let me show you the exciting new features in this new version.

1. More deployment solutions

More deployment solutions are added, especially for wifi networks. We also added solutions to monitor by mac address in multiple segments networks. In WFilter 4.0 version, only “by ip address” mode is supported, the new version will retrieve mac address information from your core switch via SNMP.

2. More monitored content

Added support for ip protocols and ip fragment. For web monitoring, WFilter new version will record browser type(userAgent) as well.

3. Faster UI speed

We adopted fastcgi technology in the new 4.1 version, which makes great improvement on UI loading speed. Monitoring performance is also improved.

4. New UI design

Added “common” menu for you to define common used menus, so you can open a page within one click.

We also re-designed the “online computers” page.


5. New “Protocols” system

With this “protocols” system, you can download and share protocols within a few clicks. You will never have the pain to configure new protocols any more.

6. New “Plugins” system

We integrated a set of tools for network monitoring and management, which is still growing. You can get plugins for network discovery, wfilter management and other related features.

7. New “web content push” feature

This feature enables you to push web content without a real blocking. You can define time interval, web push triggers for this content to appear regular in client computers.

8. More flexible policy settings

With the last version, it’s easier to assign policy for new detected devices, and set default OU policy for new detected AD users.

New version downloading URL: WFilter 4.1

Please notice: WFilter 4.1 version is still in beta testing, and some features are not fully tested. This version is only for preview and testing purpose. So if you already have a stable WFilter 4.0 running, it’s not wise to replace it with this beta version.

Turn your PC into a Wi-Fi HotSpot to deploy WFilter internet monitoring

This document decribes a new deployment of WFilter in a wireless network. The solution is to turn the wfilter computer into a wifi hotspot. So wfilter can monitor wifi clients using this hotspot.

Please notice: this solution uses the wireless adapter of the wfilter computer to share internet connections, its wifi signal might not be so strong as your wireless router.

1. Network Topology

2. Creating Wi-Fi HotSpot

Please check below steps to creating wi-fi hotspot in win8 enterprise. The detailed steps might be different in other windows versions.

1). This desktop has a wireless adapter.

2). Run “cmd” as Administrator. Enter the following command:

netsh wlan set hostednetwork mode=allow ssid=Test key=password

This command in below figure will create a wireless access-point with SSID of “Test” , key of “12345678″. You can modify the “ssid” and “key” as you want.

3). Run the following command to start wifi hotspot.

netsh wlan start hostednetwork

4). Now you will see a new microsoft hosted network virtual adapter.

5). Open your wifi’s property to enable internet connection sharing to the virtual adapter.

Now you shall be able to see the new wifi hotspot in mobile devices. Clients using this hotspot can be monitored by wfilter.

There are several other ways to create a wifi hotspot, you may do it in a way you like.

3. Setup WFilter

1). Run “Configuration Wizard” in “Help” of WFilter

2). Choose “pass-by mode”, set the wireless adapter as the “monitoring adapter” and “blocking adapter”, check “this adapter is wireless”.

3). Next until finish. Now you’re able to monitor connected wifi clients.

Deploy WFilter with a virtual openwrt gateway.

This deployment implements a gateway with openwrt running in a virtual machine. So you can run WFilter in the host computer to monitor client computers.

In case you don’t have a mirroring device, you can use this deployment instead. It’s also powerful and reliable.

1. Network Topology

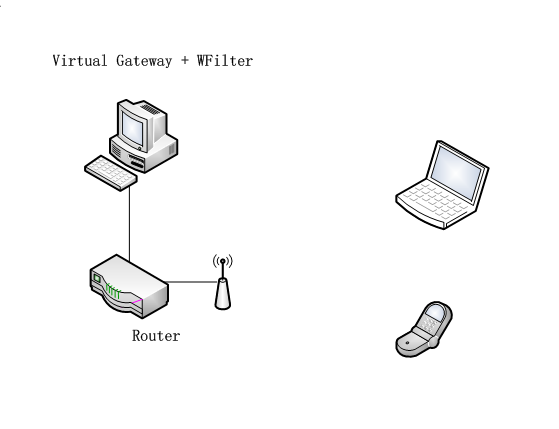
The virtual openwrt gateway is connected to original gateway by a cable. It serves a new subnet to client devices.

2. Steps to build the openwrt virtual gateway.

The host PC runs a windows system and shall be connected with a wired network card.

1). Download and install VirtualBox

Download URL: https://www.virtualbox.org/wiki/Downloads

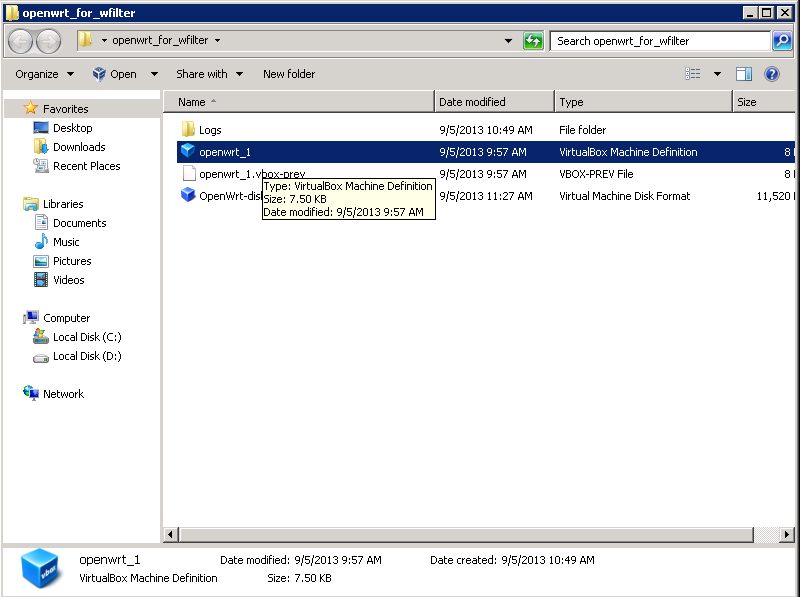
2). Download the pre-built openwrt vm.

Download URL: openwrt for wfilter

Uncompress it to a local directory, double click file “openwrt_1.vbox”

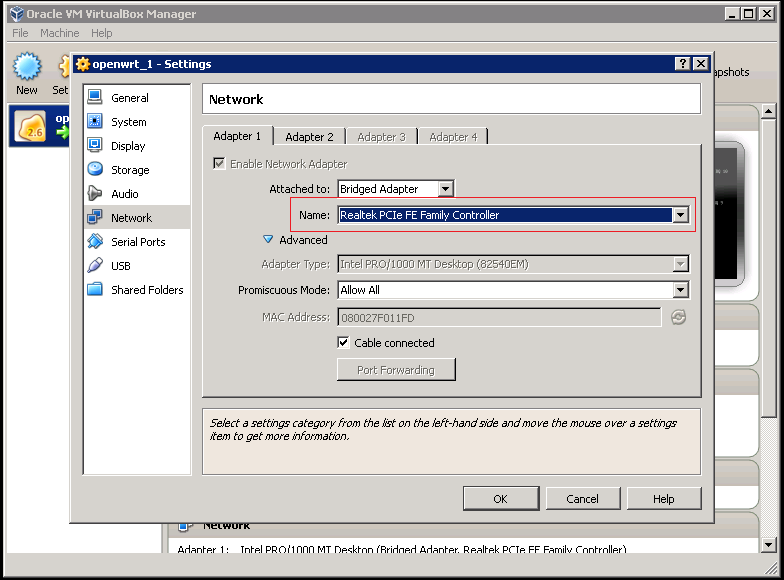
You need to modify the “network settings” of this vm, change “Adapter 1″ and “Adapter 2″ to the network card which is connected to your current gateway.

Now you can start the openwrt vm.

3). Launch openwrt web UI

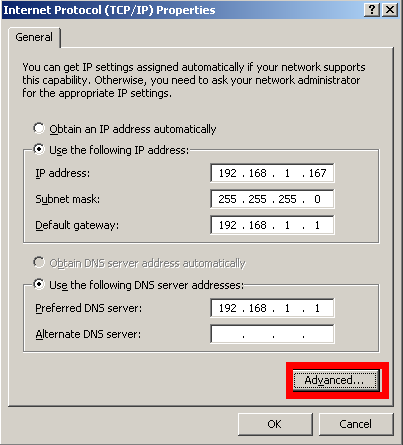
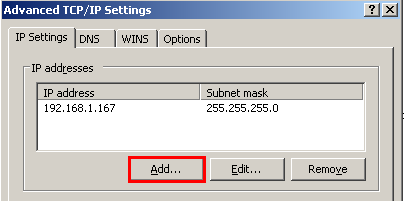
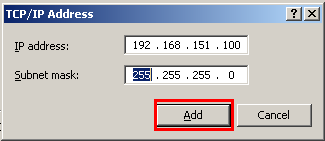
The vm is assigned with a default ip address “192.168.151.1″, to access its web UI, you need to add a 192.168.151.100 ip address to your current adapter.

Now you can access openwrt web UI in your browser, from url http://192.168.151.1

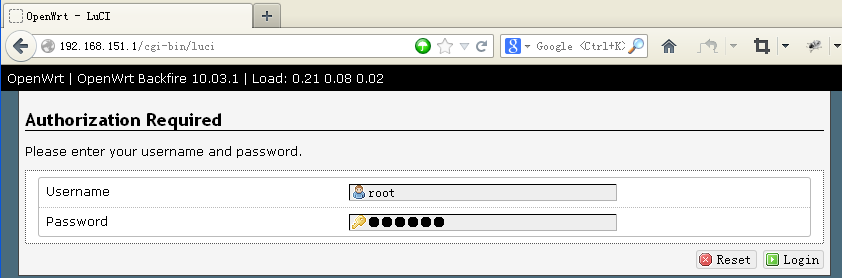
Username is root, default password is: im1234

4). Configure Wan Interface

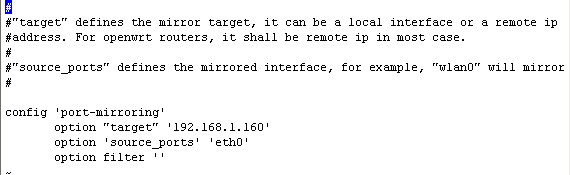
You can configure wan interface in “Network”->”Interfaces”->”BR”.

The default Wan ip address is “1.1.1.1″, you need to modify it according to your network settings.

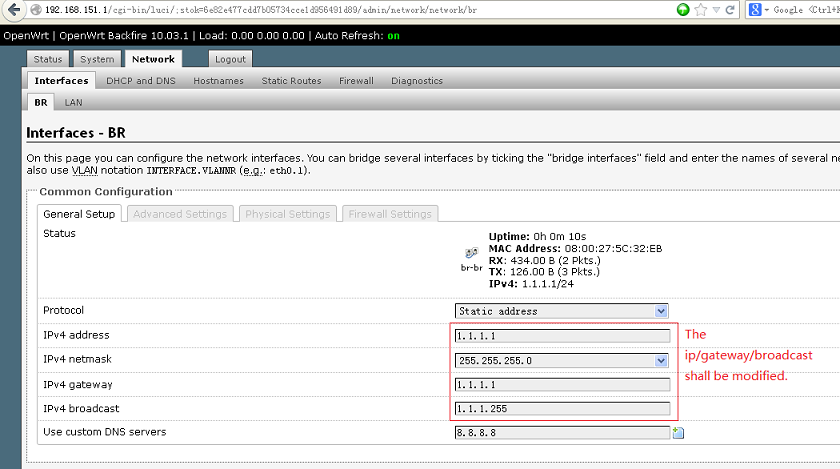
Assign a valid ip address and the gateway ip address to the wan interface.

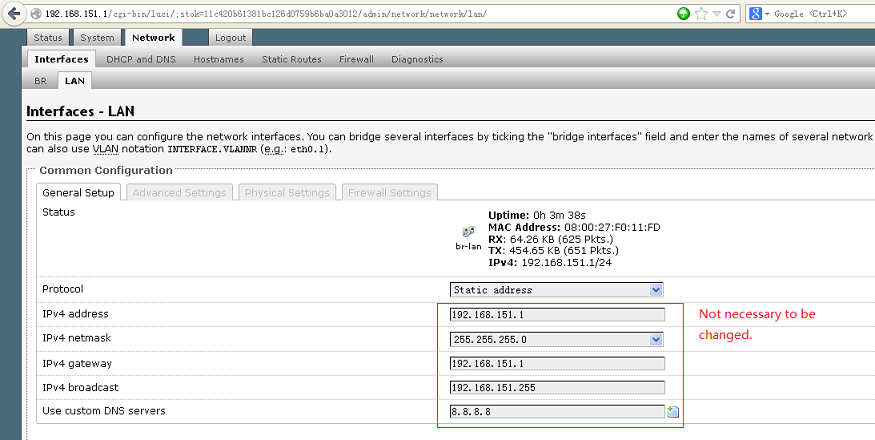
4). Configure Lan Interface

You don’t have to modify the lan interface settings, unless you want to change the default subnet “192.168.151.0″.

3. Disable DHCP in current gateway

The existing dhcp server(usually the gateway) shall be disabled.
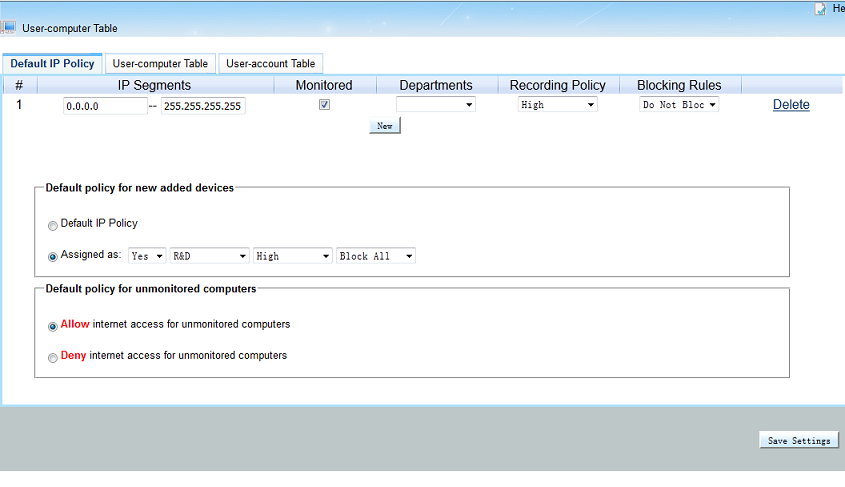
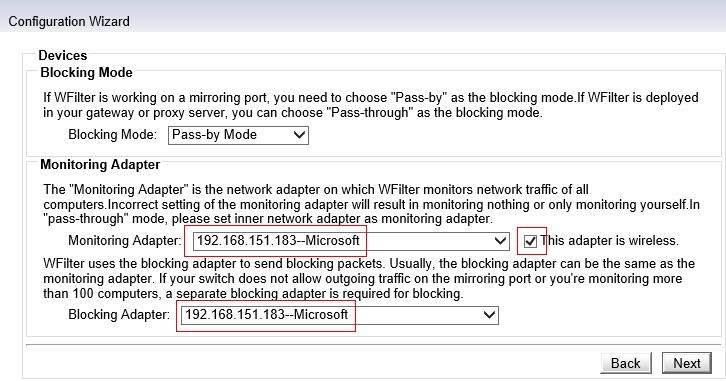
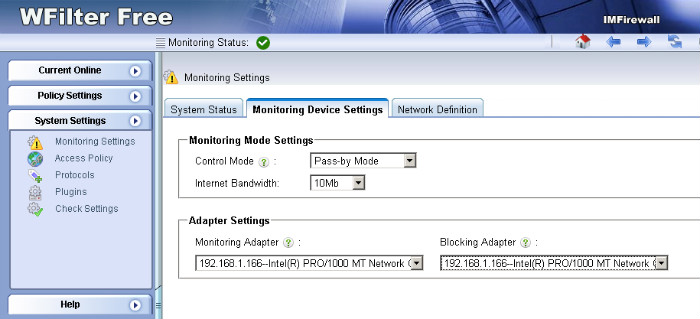
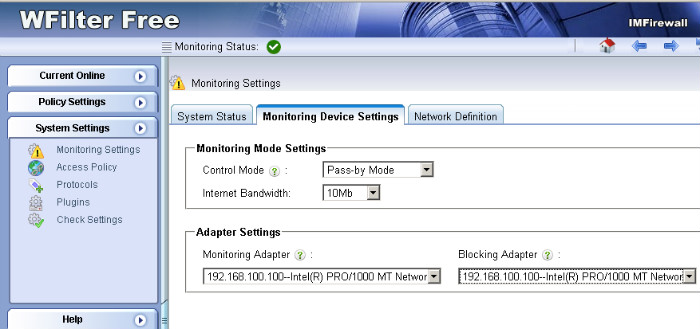
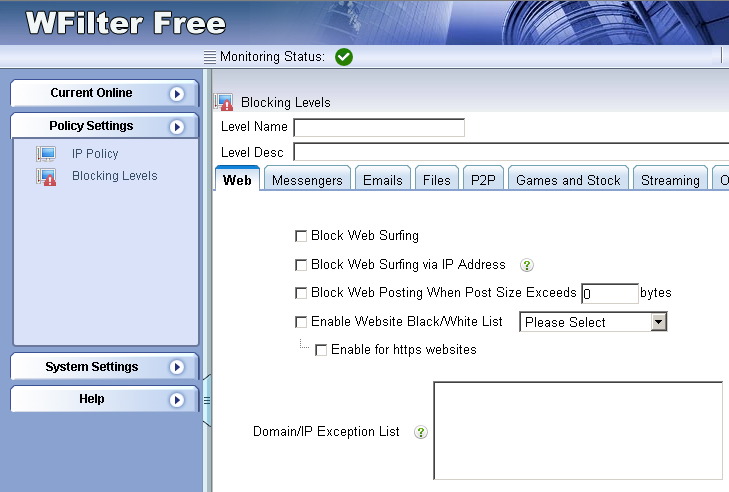
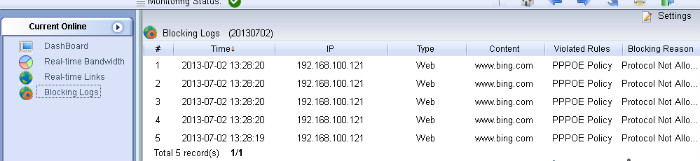
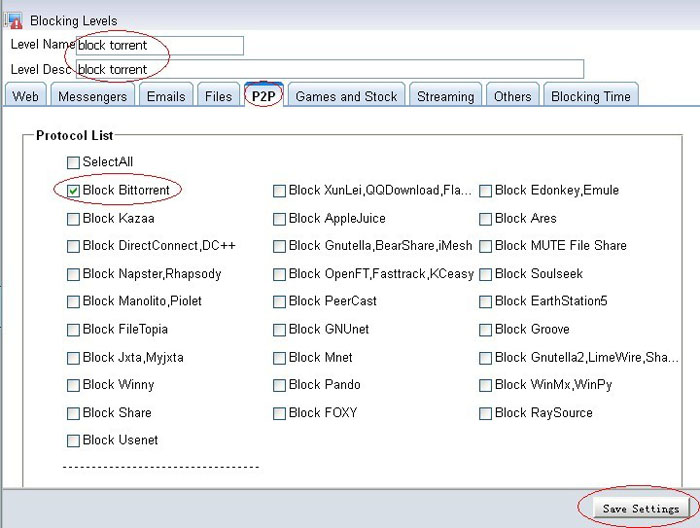
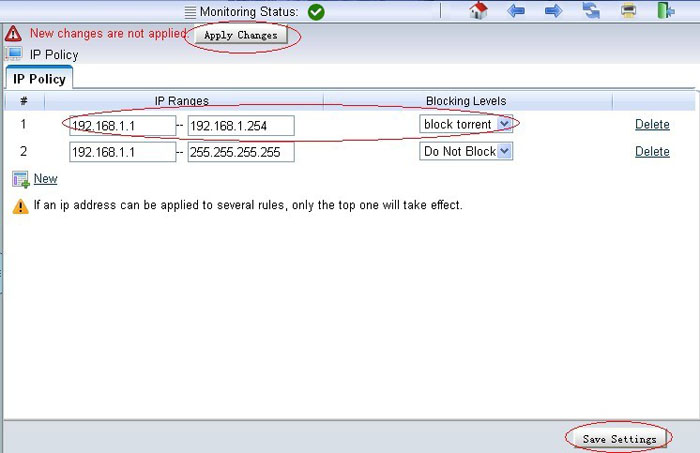
4. Setup WFilter.

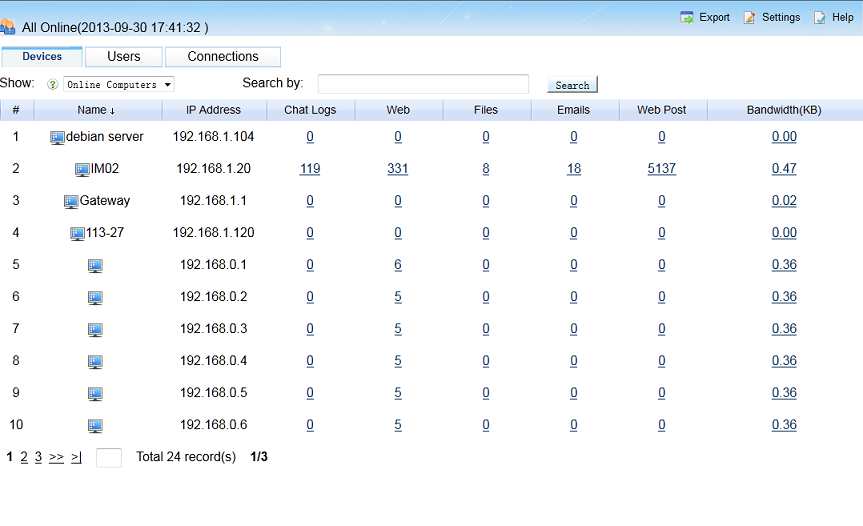
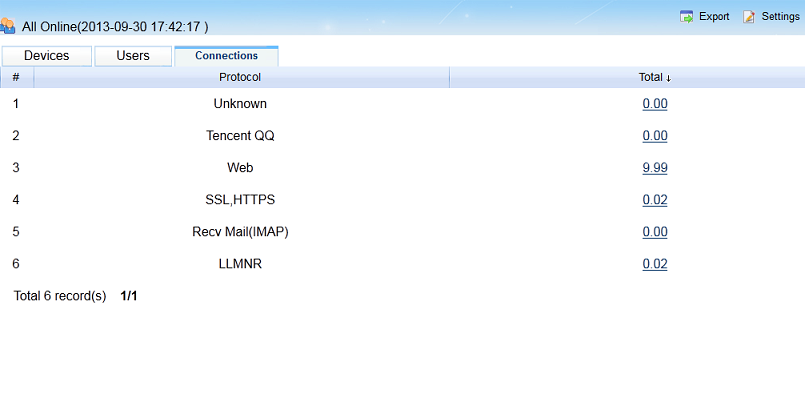
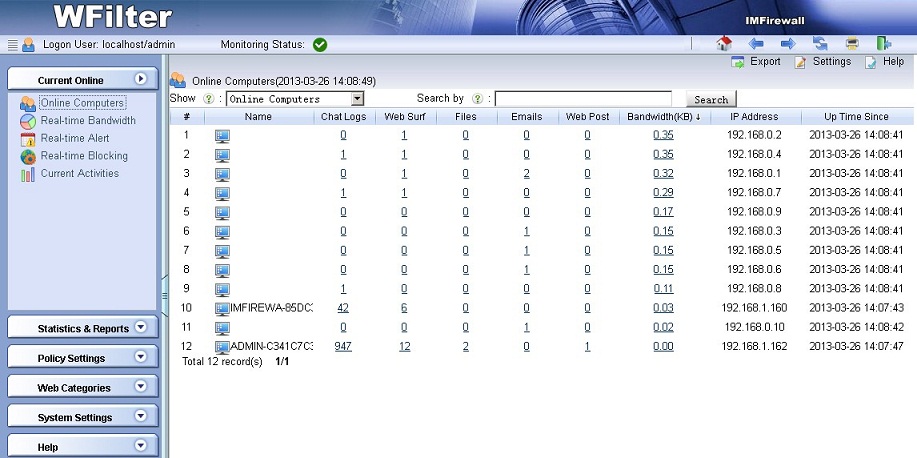
Now the virtual gateway is acting as a gateway and dhcp server in your network. Devices obtain ip addresses from this virtual gateway can be monitored in WFilter.

How to submit support file of WFilter?

Due to complicated settings and network topology, it’s not easy to describe a question of WFilter.

For us to understand your question easier, we recommend you to use the “support” feature of WFilter to submit your support request. The “support” feature will gather required settings and network packets samples for diagnose purpose. So we can locate the problem quickly.

It’s simple to submit a support request. In most case, you only need to describe your question and click “submit”. (Figure 1)

In case when your question is related to a certain behavior(for example, email sending is not recorded), we will need a packet dump of this behavior.

You need to check “Add packet dump file(s)”, and click “Restart Capturing” for WFilter to start packet capturing. (Figure 2)

The default packet dump captures packets of all client computers. To make it simple, you’re recommended to capture packets for the testing client computer only. (Figure 3)

We will reply you by email when we get your support request.

How to monitor and filter internet activities of PPPOE users?

PPPOE is widely used for user authentication and traffic accounting. However, it’s a little difficult to monitor and filter PPPOE clients’ internet usage and behavior.

In this example, we will demonstrate you to monitor and filter PPPOE clients with WFilter Free. Please notice that only non-encrypted and uncompressed PPPOE traffic can be supported. So the first step is to configure your PPPOE server for non-encryption and non-compression.

1. PPPOE server settings

Let’s take windows 2003 and RouteOS for examples.

1). 2003 Server Configuration

If you are using windows 2003 server as the PPPOE server, please follow below steps to configure:

In “Properties” of the “Routing and Remote Access”, disable “software compression” and “LCP” in the “PPP” tab.

Edit “remote access policy” for “no encryption” in “Edit Profile”. Notice: The default two policies shall all be modified.


2). ROS Configuration

If you are using routeOS as PPPOE server, please follow these steps to disable compression and encryption:

In “PPP” tab of “Profiles”, click “Protocols” and disable compression and encryption.

2. Monitor PPPOE clients in WFilter

2.1) Choose the internal adapter

Now WFilter is able to parse PPPOE traffic. In this example, we just install WFilter free in the windows 2003 PPPOE server.

You need to choose the internal adapter as the “monitoring adapter” in “System Settings”->”Monitoring Settings” of WFilter.


2.2). Setup client policy

Add a block policy to block web surfing.


Apply this policy to PPPOE clients’ ip ranges


2.3). Check Blocking

PPPOE clients get blocked.

Blocking events in WFilter.

How to block torrent downloading with WFilter free?

From version 1.0.171, WFilter free is able to block bittorrent traffic on network. In this guide, I will demonstrate you to block torrent downloading with WFilter free edition.

1. New a “block torrent” policy

2. Define ip ranges to be blocked.

Apply the “block torrent” policy to client ip ranges.

3. Check “Blocking Logs” .

Check WFilter’s blocking history logs, you will be able to see events of torrent blocked.

4. Check bittorrent program.

Bittorrent download speed will be zero when blocked.

Wifi network monitoring solutions

Since most wireless network cards do not support “promiscuous mode”, it becomes complicated to deploy internet monitoring and filtering in a wifi network.

In this blog, I will list three common solutions for wifi network monitoring.

1. Port mirroring

Some wireless router can support “port mirroring” feature. If your router support this feature, you can enable the mirroring port and connect the WFilter computer to the mirroring port. The WFilter computer shall have a wired network card can be connected to the mirroring port by a cable.

This cisco article provides a good guide: Configuration of Port Mirroring on WRVS4400N Wireless-N Gigabit Security Router

2. Deploy WFilter in an upper layer device

In case you have an upper layer device with “port mirroring” feature, you can deploy WFilter in the upper layer. Check this solution: WFilter deployment in a wireless network

3. Configure the WFilter PC as internet gateway.

This solution is helpful when you only have ONE wireless router in your network, it’s rather simple for WFilter deployment. This solution rather helps when you don’t have a port mirroring switch or router.

Check this solution at here: A simple deployment of WFilter with wireless router

4. Turn your PC into a Wi-Fi HotSpot to deploy WFilter

You can turn your windows PC into a wifi hotspot, so clients connected to this wifi hotspot can be monitored by WFilter.

Check this solution at here: Turn your PC into a Wi-Fi HotSpot to deploy WFilter

5. Reflash your router into an embeded linux system.

If none of above solutions works for you, you can choose to reflash your router into openwrt/ddwrt/tomato/gargoyle firmware. These firmware allows you to install software port-mirroring solutions.

Here is a guide: WFilter deployment with openwrt router.


WFilter deployment with gargoyle router.

1. Gargoyle Router Introduction

Gargoyle is an OpenWrt distribution which aims to be easy to use through a simplified Web interface. Gargoyle can extend your wireless router into a powerful Linux system. even if your router hardware does not support “port mirroring” function, you can also enable traffic mirroring by software mirroring.

This blog will guide you to install “port-mirroring” program in your Gargoyle router and deploy WFilter for internet monitoring and filtering. We assume you already has an Gargoyle router, if not, please check Gargoyle homepage to get the latest firmware.

2. Port-mirroring program

Port-mirroring is an open source project sponsored by IMFirewall Software, it is designed to mirror network traffic on linux systems.

2.1. Installation

For detailed installation guide, please check Port-mirroring open source packet mirroring. In this guide, let’s take linksys wrt54g router as an example.

Steps:

a). opkg update.

b). opkg install http://port-mirroring.googlecode.com/files/port-mirroring_1.3-1_12.09_brcm47xx.ipk

Because gargoyle is based on openwrt attitude adjustment 12.09 branch, we need to install the build for openwrt 12.09.

2.2. Configuration

You need to edit /etc/config/port-mirroring to set the mirroring target and mirrored source interfaces.

In this example, we choose “eth0″ wireless adapter as the mirrored source interface.

2.3. Start Port-mirroring

/etc/init.d/port-mirroring start

3. Check monitoring in WFilter

Now WFilter shall be able to monitor client computers.