Monthly Archives: April 2012

How to set a redirect denial page in WFilter?

Sometimes you might want to redirect blocked websites to a new URL. To do this, you need to edit WFilter denial page in source mode.

This tutorial will guide you to configure a redirect denial page in WFilter.

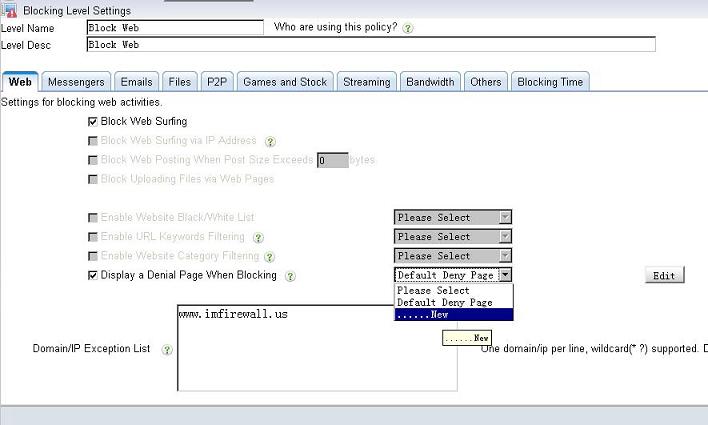
First, edit a blocking level

Edit a blocking level and new a denial page. Please don’t forget to list your new URL in the exception list.

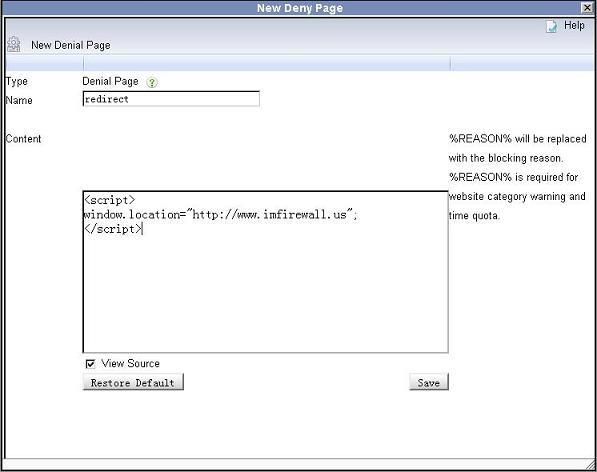
Second, edit the denial page in source mode.

A javascript code is required:

<script>window.location=”http://www.yourwebsite.com/…”;</script>

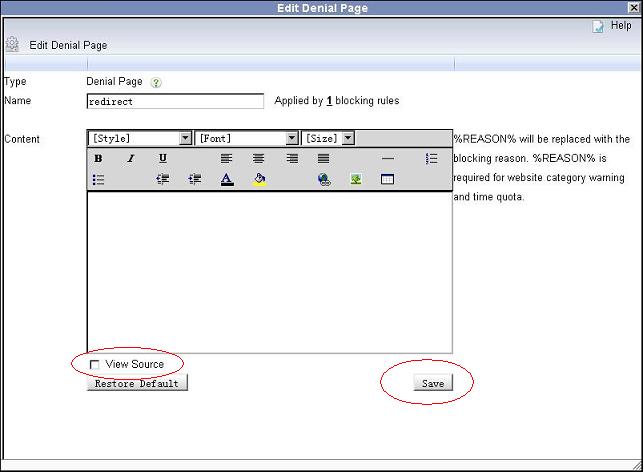
Third, uncheck “view source” and click “Save” to save the settings.

Please notice, click “save” after unchecking “view source”.

Done, now all blocked web request will be redirected to the new url.

More information, please check “WFilter Enterprise”.

Other related links:

How to block UDP ports in RRAS windows server 2003?
How to block internet downloading?
How to monitor internet usage on company network?
Internet monitoring software for business
How to filter web surfing?
How to block websites and restrict internet access?
How to block HTTPS websites on my network?

When shall you use two network cards for monitoring and blocking?

In “pass-by” filtering mode(WFilter works on a mirroring port), WFilter sends RST packets to block TCP connections. However, if outgoing traffic is limited on the blocking adapter, blocking feature of WFilter might not be working.

The default settings of WFilter use a same adapter for monitoring and blocking. However, it will not work if a following condition is met.

  1. The monitoring switch does not allow outgoing traffic on the mirroring port. You can check this by “ping” other computers in the monitoring computer. This problem can be solved by changing switch settings(if supported) or adding a separated blocking adapter. Cisco switches have a parameter “ingress” to enable outgoing traffic on the mirroring port.
  2. The monitoring adapter is too busy of receiving mirrored packets. We recommend you to use another NIC for blocking when you have 50+ computers. To check this issue, you can run “System Settings”->”Check Settings” to perform a checking on the blocking adapter.

Steps to add a blocking adapter

1. Add a physical network card and connect this NIC to a normal port in your switch. If you have multiple VLANs, the blocking adapter shall be in a VLAN which can reach other VLANs.

2. Assign an available ip address and gateway settings to the new NIC.

3. If WFilter does not detect the new card in “System Settings”->”Monitoring Settings”, please click “Start”->”IMFirewall WFilter”->”Tools”->”Restart WFilter Service” to reload the adapters list.

4. Choose the new network card as the “blocking adapter” in “System Settings”->”Monitoring Settings”->”Monitoring Device Settings”.

5. Run “System Settings”->”Check Settings” to check.

6. Sometimes windows can not choose the correct network card for communicate, in that case, please check this topic to set “Metric”: Blocking adapter doesn’t work when using two network cards

Further readings:

How WFilter works to block internet connections in network?

How to block VNC traffic of network computers with WFilter?

VNC® provides secure remote access computers from any location for your home and organization. RFB is the protocol used in VNC and its derivatives.


This tutorial will guide you to block VNC with “WFilter Enterprise 4.0″. Because blocking of VNC is not supported by default in WFilter, in this example, we uses “Customize Protocols” feature of WFilter to define the VNC protocol.


First, Add “VNC” Protocol in “Customize Protocols”.


In “Customize Protocols”, new a protocol named “vnc”.


VNC has a pattern:
“vnc_tcp”:
Type–”TCP ALL”
Format–”0″
Pattern Content–”^\x52\x46\x42\x20\x30\x30″


Second, Enable blocking of VNC in certain blocking levels.


And apply this blocking policy to certain computers.


Now, VNC will be blocked.


WFilter blocking events:


Failure connection of VNC.