Monthly Archives: December 2009

Blocking adapter doesn’t work when using two network cards with WFilter.

Some switches does not allow outgoing traffic on a mirroring port. In this case, WFilter needs a separate blocking adapter to send blocking packets. And if you’re monitoring and filtering more than 100 computers, we recommend you to use a different blocking adapter as the monitoring adapter.

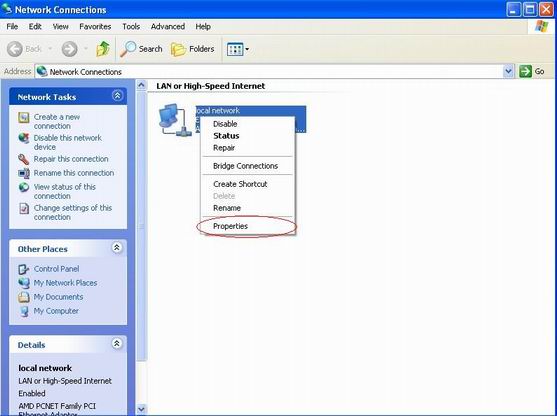
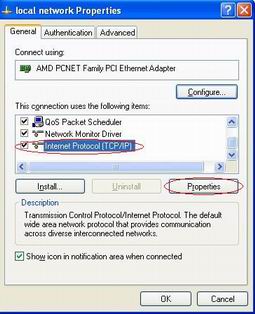
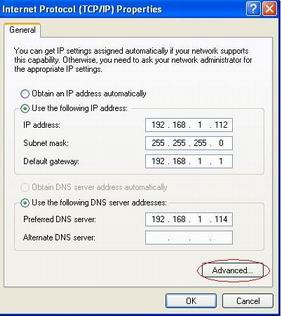
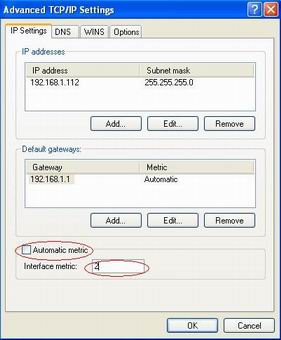
When the two network cards are installed, we will want the Windows system to use the blocking adapter to access your network. However, sometime the Windows system might pick up the monitoring adapter and fails to connect to your network. This problem can be resolved by the “Automatic Metric” setting in Windows.

A metric is a value that is assigned to an IP route for a particular
network interface that identifies the cost that is associated with
using that route. The Automatic Metric feature is configured independently for each network interface in the network. This feature is useful in situations where you have more than one
network interface of the same speed, for example, when each network
interface has been assigned a default gateway. In this situation, you
may want to manually configure the metric on one network interface, and
enable the Automatic Metric feature to configure the metric of the
other network interface. This setup can enable you to control the
network interface that is used first in the routing of IP traffic.

In our case, the “Automatic Metric” of the blocking adapter shall be smaller than the monitoring adapter. So by setting “Automatic Metric” of the blocking adapter to “1″, and the monitoring adapter to “2″, Windows system will use the blocking adapter to access your network.

Use dumpPacket.exe of WFilter to generate a packet dump file.

Sometimes, on an indeterminate problem of using WFilter, we might need a packet dump file for diagnosis. WFilter has a packet dump tool named “dumpPacket.exe”, which will dump packets on the monitoring adapter.

This tutorial will guide you to generate a packet dump file using “dumpPacket.exe”.

First, lauch “dumpPacket.exe” from “Start”->”IMFirewall WFilter”->”Tools”. If you didn’t install WFilter shortcuts, you can find this tool in WFilter directory.


It will ask you to enter a testing ip address. For example, if
you need to check a monitoring problem for ip “192.168.1.20″, you can
input “192.168.1.20″ here. If you just want to capture some packet
samples, you may just press “enter” here! Press “enter” means dumping
packets for all computers.

Close the dumping window. If you’re doing a certain test, you need to wait until the test is done. For example, sending an email message.  If you’re dumping packets for all computers, you only need to wait for 3-5 seconds because the dump file can be very large. If the dumping file is too large, you can do the test again in a shorter time.

The dump.cap file can be found in “temp” directory of WFilter. The dump.cap file is pcap format, which can be opened by wireshark and other pcap applications.

How to check whether port mirroring settings are correct?

To make WFilter work, you need to setup port mirroring in your switch. However, sometimes you might still cannot monitor other computers even port mirroring is configured. It has several possibilities:

1. WFilter computer shall be connected directly to the mirroring port.
2. Configured ports does not match real ports.
3. Both outbound and inbound traffic is required by WFilter. If you only mirror one direction packets, WFilter can not work properly.
4. Incorrect WFilter settings. (wrong ip segment or monitoring adapter…)
5. Firewall/anti-virus programs blocks non-local packets. For example, nod32 will block non-local packets, so even port mirroring settings are correct, the mirrored traffic still can not reach WFilter. We recommend you to shutdown your firewall and anti-virus programs for checking.

To locate the problem, first we need to confirm whether packets are mirrored to WFilter computer. It can be checked in a simple way following below steps:


Upon successful mirroring, the “Received” packets number shall be much larger than the “Sent” packets. If not, you need to check certain mirroring settings or cable connections.

How to block limewire downloading on company network?

LimeWire is a free peer-to-peer file sharing (P2P) client for Windows, Mac OS X, Linux, and other operating systems supported by the Java software platform. It uses the Gnutella network and also the BitTorrent protocol.

Using Limewire, users can easily download copies of copyrighted materials and illegal or objectionable content. In LimeWire versions prior to 5.0, users could accidentally configure the software to allow access to any file on their computer, including documents with personal information. Though recent versions of LimeWire do not allow unintentional sharing of documents or applications, it still opens a share directory to share downloaded files by default.

Therefore, to save your bandwidth and keep your network safe, you might want to block limewire program on your network.

However, though the default TCP port of Gnutella2 is 6346. You can not block limewire only by blocking this port in your router or firewall, because Limewire allow users to change its default port.

This tutorial will guide you to block limewire downloading using WFilter. WFilter blocks Limewire traffic based on signature matching despite which port it is using. Limewire can be blocked only by a single click.


Blocked limewire:

Blocking logs of limewire in WFilter:

WFilter homepage: http://www.wfiltericf.com/WFilter.htm